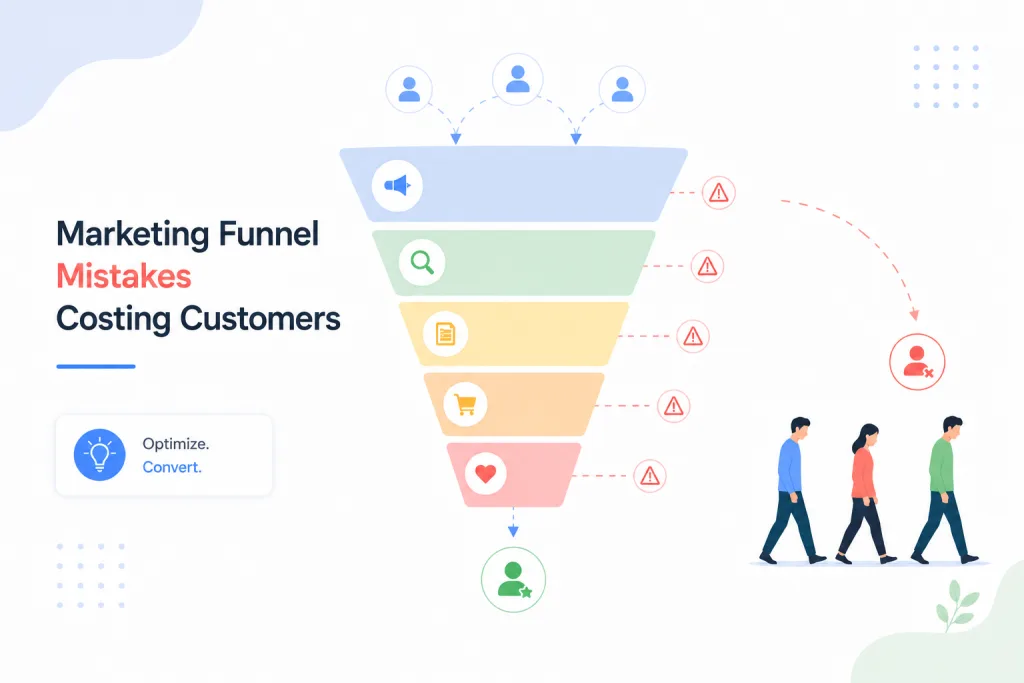
Website tracking methods like Pixel Tracking, Google Analytics, UTM Tracking, Conversion Events, and Microsoft Clarity work together to help understand user behavior and campaign performance. Pixel tracking monitors actions from ads, Google Analytics analyzes traffic and engagement, UTM tracking identifies traffic sources, conversion events measure key results like leads or purchases, and Microsoft Clarity reveals real user behavior through heatmaps and session recordings. Together, these tools provide complete insights to optimize marketing, user experience, and conversions.
1. UTM Tracking Setup: A Step-by-Step Beginner’s Guide
When you run digital marketing campaigns, knowing where your traffic comes from is just as important as getting traffic. UTM tracking helps you identify exactly which platform, campaign, or link brings visitors to your website.
What Is UTM Tracking?
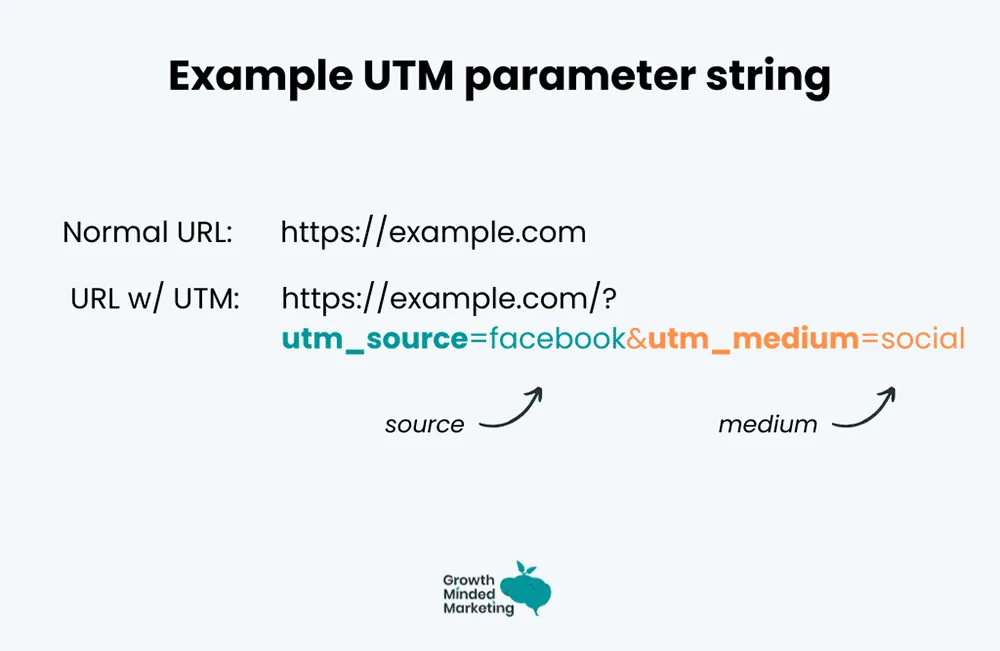
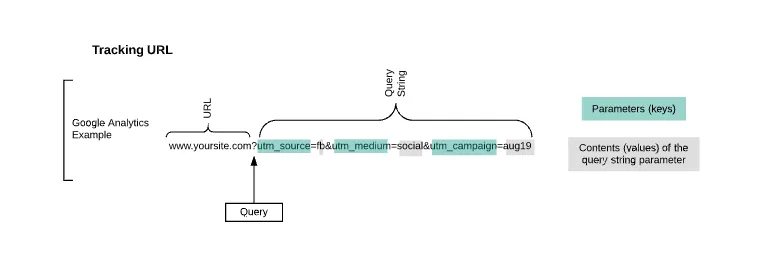
UTM tracking uses small text parameters added to URLs to track traffic sources in Google Analytics.
UTM stands for Urchin Tracking Module.
These parameters help you understand:
- Which platform sent the visitor
- Which campaign performed best
- Which ad, link, or button was clicked
UTM tracking is commonly used for:
- Social media links
- Paid ads
- Email campaigns
- WhatsApp & SMS marketing
UTM links are created using five parameters. Out of these, three are mandatory and two are optional.
Mandatory Parameters
- utm_source – Where the traffic comes from (e.g., facebook, google, newsletter)
- utm_medium – Type of traffic (e.g., cpc, social, email)
- utm_campaign – Campaign name (e.g., summer_sale, lead_gen)
Optional Parameters
- utm_term – Used mainly for keywords in paid ads
- utm_content – Used to differentiate ads, buttons, or creatives
Step 1: Open Google Campaign URL Builder
To create UTM links easily, use the official tool from Google called Campaign URL Builder.
This tool helps generate correct and error-free UTM links.
Step 2: Enter Your Website URL
Paste the landing page URL where you want users to arrive after clicking the link.
Make sure the URL is correct, secure (https), and active.
Step 3: Add UTM Parameters
Fill in the UTM fields carefully:
- Campaign Source → facebook
- Campaign Medium → cpc
- Campaign Name → lead_campaign_jan
- Campaign Term → optional
- Campaign Content → image_ad_1
Use lowercase letters and no spaces to keep data clean in analytics.
Step 4: Generate the UTM Link
Once details are filled, the tool automatically creates a UTM-tagged URL.
This URL is now ready to be used in ads, emails, or social media posts.
How to Track UTM Data in Google Analytics
Step 5: Check UTM Reports in GA4
Open Google Analytics 4 and go to:
Reports → Acquisition → Traffic Acquisition
Here, you can view:
- Source / Medium
- Campaign performance
- User behavior
- Conversions
This shows exactly which campaign is bringing results.
2. Pixel Tracking Setup: A Step-by-Step Beginner’s Guide
In today’s digital marketing world, running ads without tracking is like driving with your eyes closed. Pixel tracking helps marketers understand what users do after clicking an ad. In this blog, you’ll learn how to set up pixel tracking step by step, explained in simple language.
What Is Pixel Tracking?
Pixel tracking is a small piece of code placed on your website to track user actions such as page visits, form submissions, purchases, and sign-ups.
It helps advertisers measure results, improve ad performance, and run retargeting campaigns.
Pixel tracking is mainly used with Meta Ads (Facebook & Instagram) and Google Ads.
How to Set Up Meta (Facebook & Instagram) Pixel
Step 1: Create a Meta Pixel
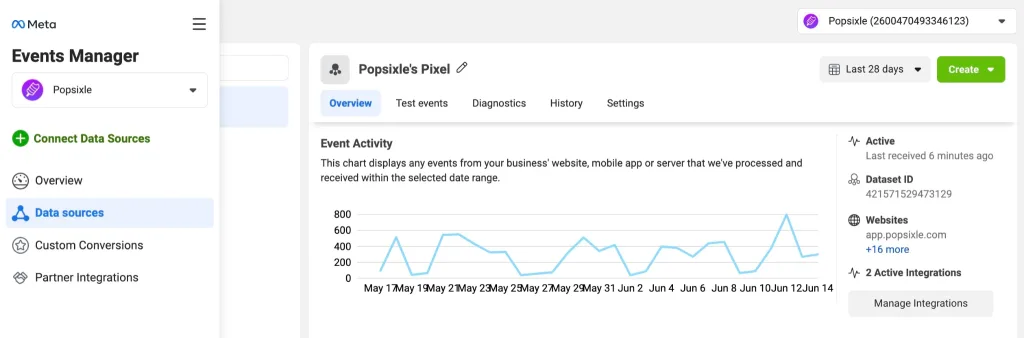
The first step is to create a unique pixel for your website. This pixel acts as an identity that allows Meta to recognize visitors coming from your ads.
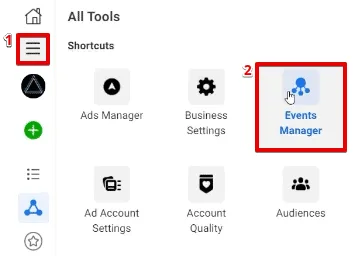
Go to Meta Business Manager, open Events Manager, select Connect Data Sources, choose Web, and create a new Meta Pixel by giving it a name.
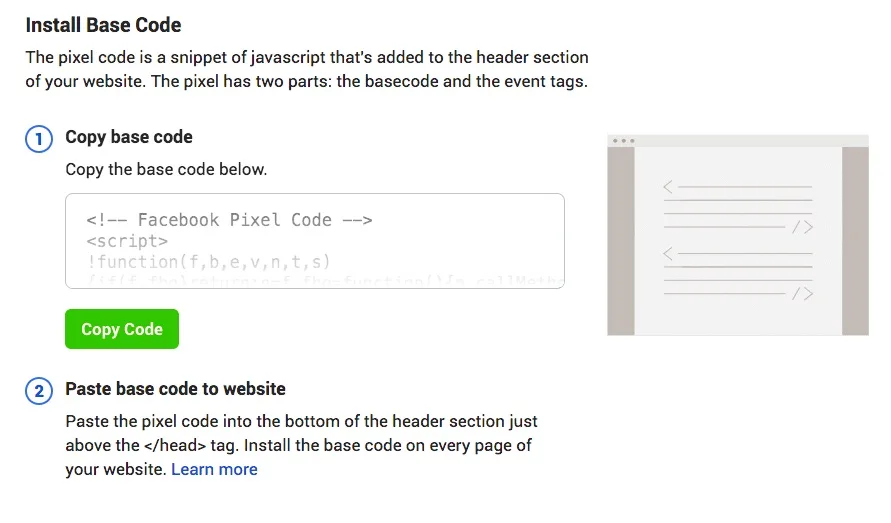
Step 2: Copy the Pixel Code
Once the pixel is created, Meta provides a base code. This code is responsible for tracking page views and sending visitor data back to Meta.
Choose the option Install Code Manually and copy the full pixel code.
Step 3: Add the Pixel to Your Website
Now, the copied pixel code needs to be added to your website. This allows Meta to track users on every page.
Paste the pixel code inside the <head> section of your website. Make sure it is added to all pages for accurate tracking.
Step 4: Set Up Events
Events help track specific actions users take, such as submitting a form or completing a purchase.
Using the Event Setup Tool, you can easily select buttons or pages on your website and assign events like Lead, Purchase, or Add to Cart—without coding.
Step 5: Test the Pixel
Before running ads, testing is very important. It confirms whether the pixel is working properly.
Install the Meta Pixel Helper Chrome extension, open your website, and check if the pixel status shows as active.
3. Conversion Events Setup: A Step-by-Step Beginner’s Guide
Running ads without tracking conversions is like studying for an exam without checking results. Conversion events help you understand what valuable actions users take on your website after clicking ads.
What Are Conversion Events?
Conversion events are important user actions you want to track on your website, such as:
- Form submission (Lead)
- Purchase
- Sign-up
- Add to Cart
- Contact button click
These events are tracked using tools like Meta, Google Analytics, and Google Ads to measure ad performance and optimize campaigns.
How to Set Up Google Ads Conversion Tracking
Step 1: Create a Conversion Action
Google Ads needs to know what result you want to track. This could be a lead, sign-up, or purchase.
Log in to Google Ads, go to Tools & Settings, click Conversions, and create a new website conversion action.
Step 2: Configure Conversion Settings
In this step, you define how conversions are counted and valued.
Choose the conversion goal, set the value (if applicable), select whether to count one or multiple conversions, and choose an attribution model.
Step 3: Install the Conversion Tag
Google provides two pieces of code: a global site tag and an event snippet.
The global site tag is added to the <head> section of your website, while the event snippet is added to the thank-you page or triggered after form submission.
Step 4: Verify Conversion Tracking
After installation, it’s important to verify whether Google Ads is receiving conversion data.
You can use Google Tag Assistant or check the conversion status inside Google Ads to ensure it shows as “Recording.”
Why Use Google Tag Manager?
Google Tag Manager (GTM) allows you to manage all your tracking codes from one place. Instead of editing website code multiple times, you can add, edit, and test tags easily through GTM.
Using GTM is considered a professional and industry-standard approach, especially for websites running multiple ad platforms.
4. Google Analytics Setup: A Complete Beginner’s Guide
Understanding how visitors interact with your website is very important in digital marketing. Without analytics, you won’t know who visits your site, where they come from, or what actions they take. This is where Google Analytics helps.
What Is Google Analytics?
Google Analytics is a free tool by Google that helps you track and analyze website traffic.
With Google Analytics, you can:
- Track website visitors
- See traffic sources (Google, social media, ads, etc.)
- Understand user behavior
- Measure conversions and goals
- Improve marketing performance
Google Analytics 4 (GA4)
Google Analytics now uses GA4 (Google Analytics 4).
GA4 focuses on events and user behavior instead of just page views, making it more powerful and future-ready.
Step-by-Step Google Analytics Setup (GA4)
Step 1: Create a Google Analytics Account
The first step is to create an Analytics account that will hold your website data.
Go to Google Analytics, sign in with your Google account, click Start Measuring, and create a new account by entering an account name.
Step 2: Create a GA4 Property
A property represents your website or app.
Enter your website name, select your time zone and currency, and choose GA4 as the property type. This allows Google to start collecting data in the GA4 format.
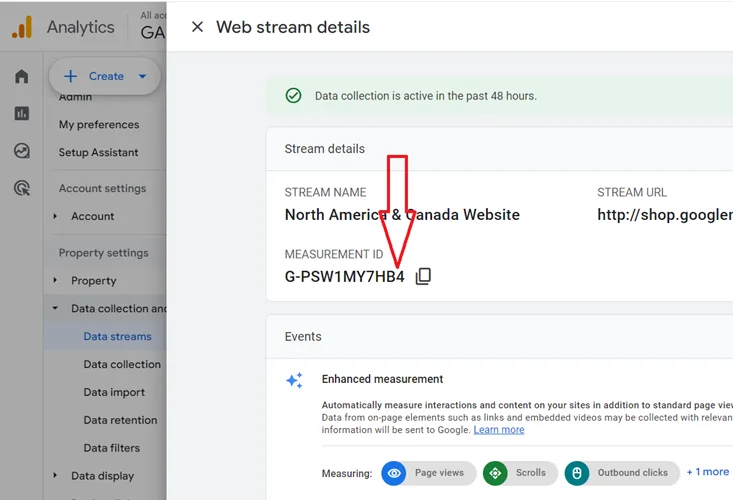
Step 3: Add a Data Stream (Website)
A data stream connects your website to Google Analytics.
Choose Web, enter your website URL, give the stream a name, and enable enhanced measurement. This automatically tracks scrolls, clicks, file downloads, and page views.
Step 4: Get the Measurement ID
After creating the data stream, Google provides a Measurement ID (looks like G-XXXXXXXX).
This ID is used to connect your website with Google Analytics and send data.
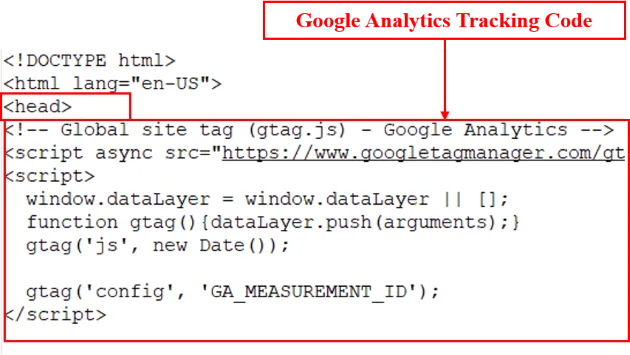
Step 5: Add Tracking Code to Website
To start tracking visitors, the Analytics code must be added to your website.
You can:
- Paste the GA4 code inside the <head> section of all pages
- Use WordPress plugins
- Use Google Tag Manager (recommended)
Once added, Google Analytics will start receiving data.
Verify Google Analytics Is Working
Step 6: Check Real-Time Data
Verification ensures that your setup is correct.
Open your website in a new tab and go to Real-Time reports in GA4.
If you see active users, your Analytics setup is successful.
5. Microsoft Clarity Setup: A Step-by-Step Beginner’s Guide
Understanding how users behave on your website is just as important as knowing how many users visit it. Numbers tell how many, but behavior tells why.
This is where Microsoft Clarity becomes extremely useful.
In this blog, you’ll learn how to set up Microsoft Clarity step by step, explained in a simple and practical way.
Step-by-Step Microsoft Clarity Setup
What Is Microsoft Clarity?
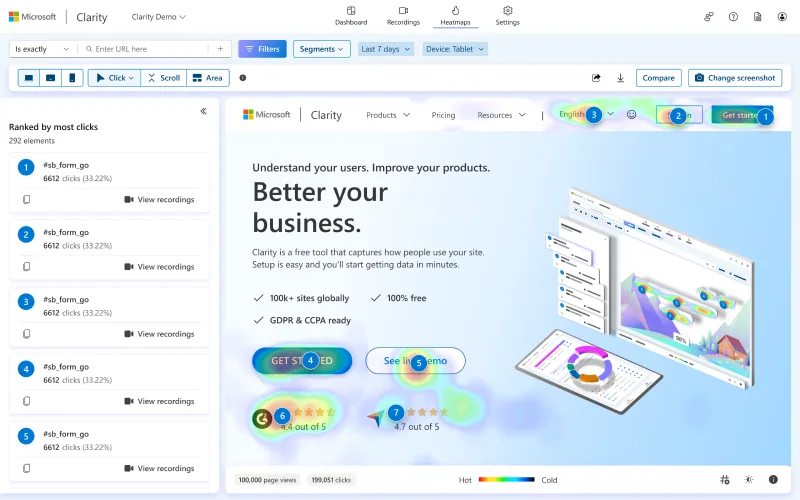
Microsoft Clarity is a free user-behavior analytics tool by Microsoft.
Clarity helps you understand:
- How users move on your website
- Where users click
- Where they stop scrolling
- What causes confusion or drop-offs
Step 1: Create a Microsoft Clarity Account
To start, visit the Microsoft Clarity website and sign in using a Microsoft, Google, or Facebook account.
After login, click Add New Project and enter your website details.
This creates a project where your website data will be stored.
Step 2: Add Your Website Details
Enter:
- Project name
- Website URL
- Category (optional)
Once submitted, Clarity generates a tracking code for your website.
This code connects your website to Clarity.
Install Microsoft Clarity Tracking Code
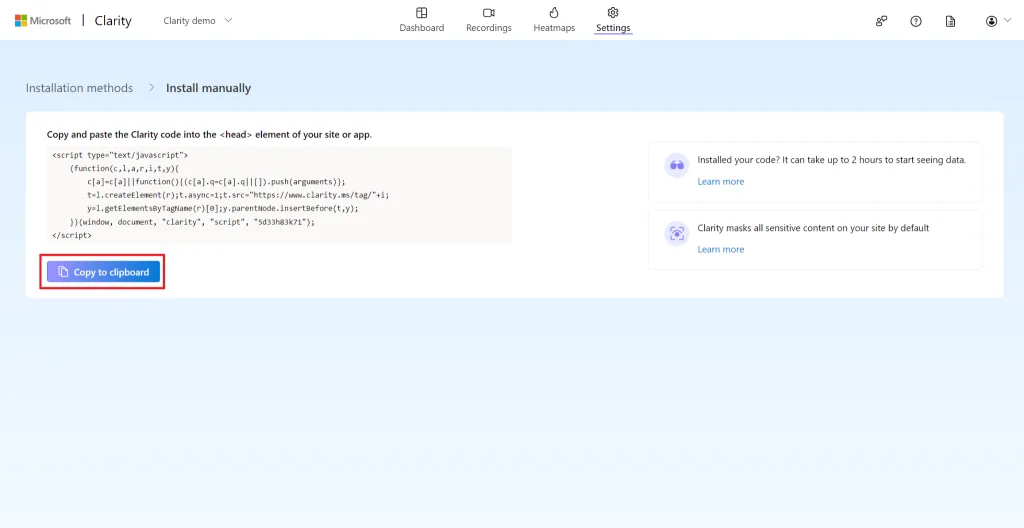
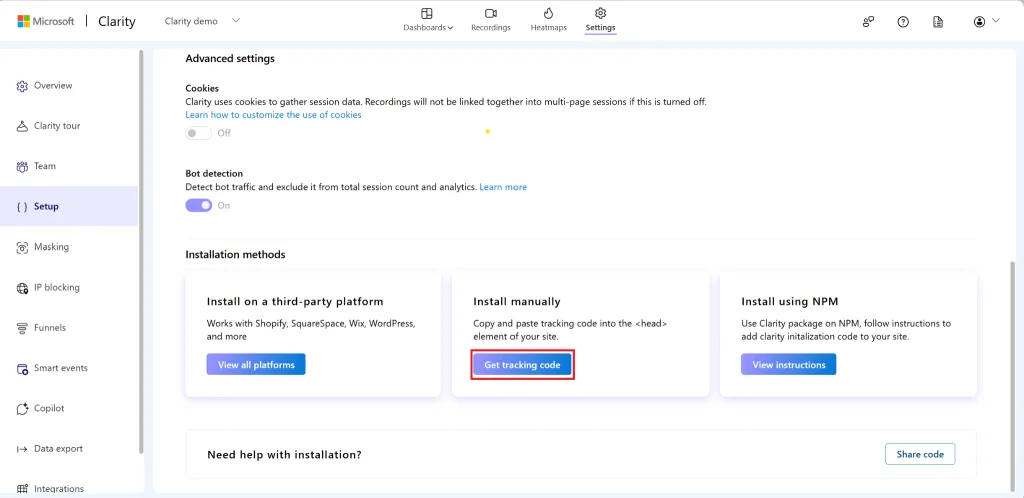
Step 3: Copy the Clarity Tracking Code
Clarity provides a small JavaScript code snippet.
This code tracks:
- Mouse movement
- Clicks
- Scroll behavior
- Session recordings
Step 4: Add the Code to Your Website
Paste the Clarity tracking code inside the <head> section of all website pages.
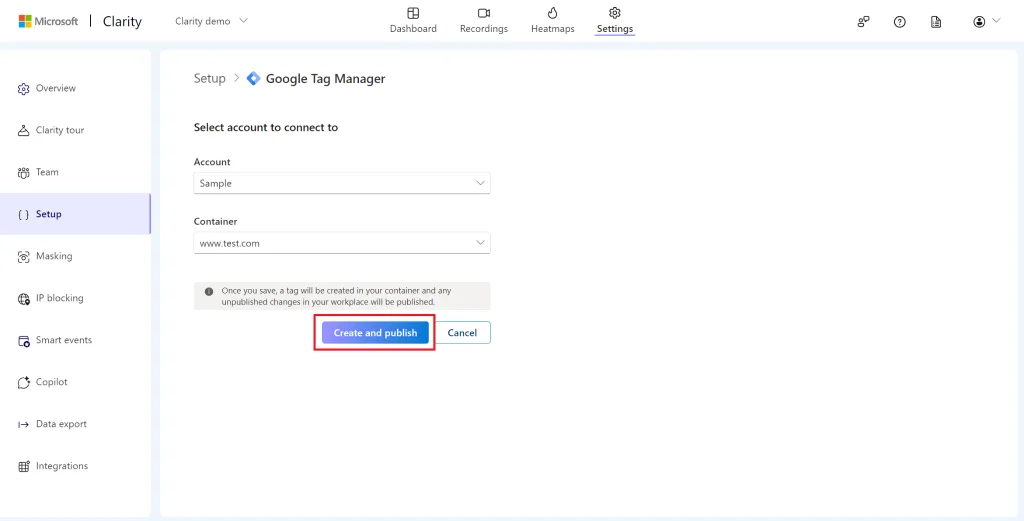
You can add it using:
- Direct HTML editing
- WordPress header plugins
- Google Tag Manager (recommended)
Once installed, Clarity starts collecting data automatically.
Step 5: Check Data Collection
After installation:
- Open your website in a new tab
- Visit a few pages
- Click and scroll
Go back to the Clarity dashboard.
If you see recordings or heatmap data within a few minutes or hours, the setup is successful.
Clarity usually starts showing data very quickly.
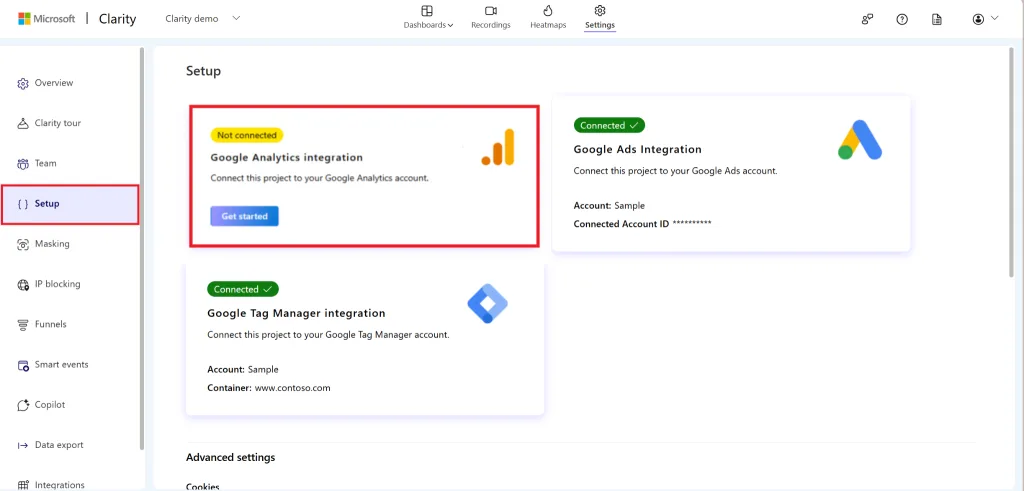
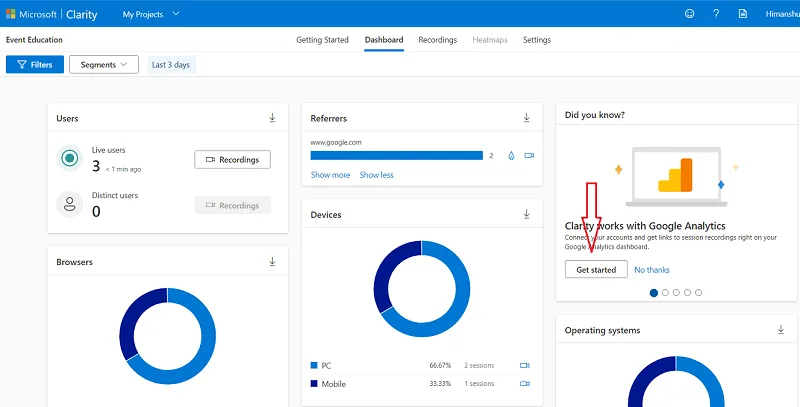
You can connect Clarity with Google Analyticsfor deeper insights.
Benefits of integration:
- View Clarity recordings inside GA4
- Combine behavior data with traffic data
- Better decision-making
This step is optional but highly recommended.
Effective digital marketing depends on accurate tracking and analysis. TheseTools {Pixel Tracking, Google Analytics, UTM Tracking, Conversion Events, and Microsoft Clarity} help marketers understand where users come from, how they interact with a website, and which actions lead to results. While analytics and UTMs show performance data, pixel tracking and conversion events connect that data to advertising goals, and Microsoft Clarity provides visual insights into user behavior. Together, these tracking methods help improve campaign performance, enhance user experience, and support better decision-making for long-term marketing success.